Methods
The resources here are part of a learning model which has the following elements:
- Game Making MISSIONS main missions involve choosing authentic game making design patterns from a menu. Other side missions help with engagement of different making preferences.
- A MAP of Learning Outcomes particularly suited to digital game making, presented in an accessible format to teachers and learners.
- Design METHODS are techniques that facilitators and learners can use to help navigate the process of making a game and reflecting on what is being learned in the process.
This page outlines methods and groups them by theme.
Methods Using Missions
- Macro Mission - Tell a Systems Story (environmental or social) through a game
- Discovering Game Mechanics
- Improving Half-Baked Game
- Limits to the Mission based approach - meeting your self in the middle
- Player and Maker types & Specialised missions
Methods Using the Learning Map / Design Process
- Circle / Physical Reflection Games:
- Guidance on Running Creative Design Sessions: imagined audience,
Other Methods
- Using Hardware and Playtesting to focus on Imagined Audience
- Predicting Code Outcomes via Games
- Coding Concepts via step by step tutorials
- Supporting Debugging
Discovering Game Mechanics
Knowing what the main mechanics for games are and making sure that they feel fun and responsive for our player is key to making a great game.
Game Mechanics are often represented as verbs. Examples include;
- Collecting
- Avoiding
- Chasing
- Shooting
- Walking / Running
The process of identifying the verbs of the game, also normally allows the participants to list the main components of the game too. This can start to build a knowledge of systems dynamics.
Identify Game Mechanics in Existing Games
We will start to understand games by playing a few arcade games and starting to look at what makes them tick. On entry participants play the following games (from MakeCode )
Write down the main VERBs for these games. Some have more than one Mechanic.
Extending this activity: This activity can be extended to analyse games using more game Components in line with game theory. A hand out is available here.
Improving Half Baked Games
This process is a way to jump right into altering code. Instead of planning from first principles, learners are given a game that is designed to provoke players to tweak it. This process is inspired by game modding and a process called using half-baked games is often called
Example Activity - Fix the Broken Game
Now we will start coding by jumping right in. Try to play this game. It’s broken right? You can’t jump high enough. Now look at the code of this broken game and use the link to workshop cards with activities to fix the game and add some elements quickly.
At the end of the session make sure to Publish a copy of your game and to give it your own name. Keep a record of the link to your game. We’ll come back to it next week.
Circle / Physical / Drama / Reflection Games
From stables of drama and community process. They are to introduce concepts in a playful way, and to help reflection - often this works just to draw participants away from their screens to interactive in a different way.
Example Activity - Reflection Web Activity to End a Session
Play a quick reflection game to find out what people thought and got out of the first session. The Reflection Web is a fun one to start with. Ask the following questions.
- Share something you found fun
- Share something you found hard
- Share something that surprised you
Line Up Reflection Activity
Paper Slide: On paper, individuals or groups sketch and write what they learned or have been working on this session. Then line up and, one at a time, slide their work under a video camera while quickly summarizing what was learned. The camera doesn’t stop recording until each representative has completed his or her summary.
For this reflection activity ask participants to include any new objectives or work on systems dynamics.
Example Activity - A Game and Tips to Keep track of our Progress and our Games
Play musical chairs. When someone is left standing up. Ask themselves
- what new idea or coding technique jumped out for you today?
- what do you want to do next?
Then share the following tips for participants to make the most of this course:
- Working on your games at home is a great way to make the most of this course - check that you have all you need to be able to access your game later
- Be careful in keeping track of the location of different versions of your games, include a version number, describe what changed, even include a bit about what you are learned since the last version
- If this works well then why not keep a separate learning journal to reflect on what you are learning?
Example Activity - Bomb and Shield
Play a game to understand the elements of a game. There is a game called bomb and shield which you can play with a small group in the following way.
- Mark out your game space, no-one can walk or run outside of that.
- Everyone choose one person but don’t say who it is. This person i your bomb
- Choose another person but don’t say who it is. This person i your shield
- Everyone walk around the space but try to keep your shield between you and tyour bomb.
Say Freeze. Stop the game and see who is safe. Play again, get them to swap people or choose new people.
Exploring the Elements of a Game
Outline the different elements of a game which can be changed by the designer to change the nature of the game.
- Components - the nouns of the game for example for a platformer (player, collectable food, enemies, end goal sprite, )
- Mechanics - the verbs of the game (walking, jumping, collecting)
- Space - changes to the layout of the game (location of platforms, does the space scroll when you move)
- Rules - what are you allowed to do, not allowed to do, what must you do (e.g. you must collect all food before progressing a level)
- Goal - what is the main goal of the player of your game (e.g. collecting points or progress to levels by reaching an end goal?)
Have these written out and ask participants to try to match them with the following elements from our game.
- Bomb, Shield, Player
- A clear space outside or in which is about the size of a room
- You are not allowed to push people out the way.
- Win the game by staying safe by having your shield protect you from your bomb
- Walking
Explain that digital games can be analysed in the same way and that we will learn to use this knowledge to make a challenging game.
Fun Project Evaluation and Reflection
You may want to use this as an opportunity to gather feedback from participants on the course to make improvements and to encourage final reflections from course members on what they gained from the game making activities. The following questions may be useful.
FUN THIS UP?
- How has your learning journey been?
- What is the most noticeable change along the way?
- Can you share about your changes in confidence in use of the specifics of coding concepts?
- What do you feel you’ve learned about wider patterns - computer programming/ systems designs?
- What are your final takeaways?
Drawing on Home and Game Cultures
This method is inspired by third space theory and the importance of being able to work with Home Discourses.
Using Hardware Device to Increase Motivation
There are different hardware available for making a splash with the finished games. Using hardware with buttons can also increase the playability of the games as well.
These include:
Hand-held Devices: A number of game-boy like devices exist which are great to use with old school buttons and mini screens. See a list here.

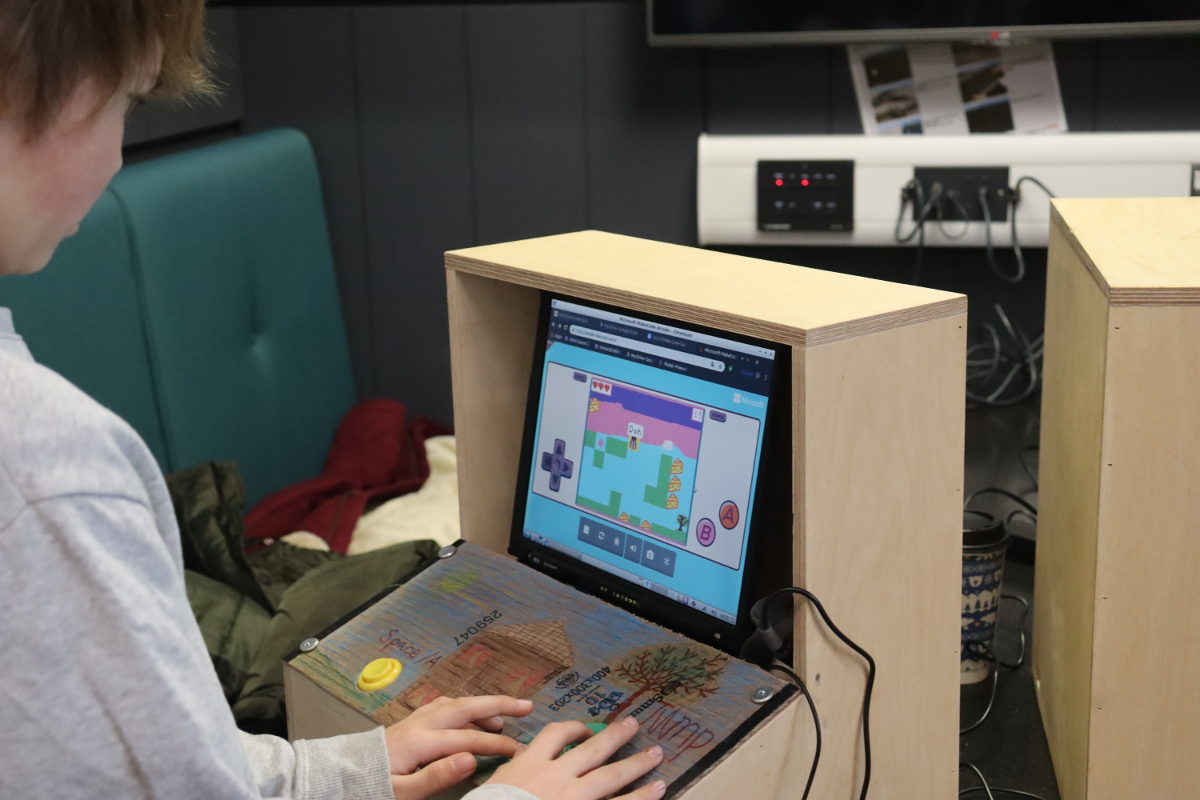
Arcade Cabinets: A bit of carpentry can create a fun looking arcade cabinet, we have some great ones where we pop in old laptops and use arcade buttons and makey makey’s to create great looking machines.
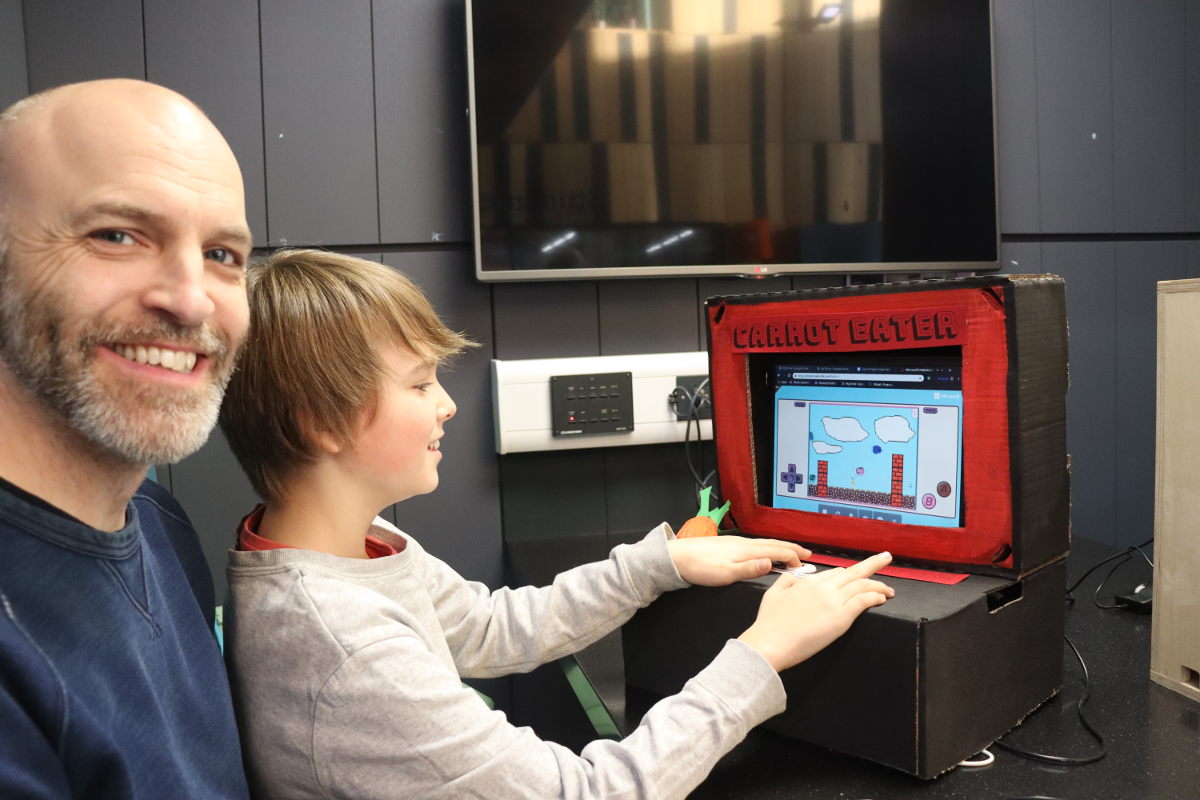
Cardboard Cabinets: Even more fun perhaps is to make your own arcade cabinet machine out of cardboard and hook up your buttons and makey makey’s to that. More info here
You may want to run an extra session on making a console with computer electronics including hardware elements of arcade buttons. There are links to resources to help you here.
If your project involves cardboard elements then it can be a great idea for participants to take the cardboard home and to decorate it with ideas from their game.
Showcasing to and External / Authentic Audience
If you do have a chance it can be a really exciting experience to showcase your games at an event or in a public place where you can get passing strangers to play your games. For our courses at the Manchester Met University we have a captive audience of undergraduate students.
I have found that this is often where parents come into their element. Ask parents to be cproactive to draw in passing people to play and give feedback on games. It is very satisfying to witness strangers play your game and experience the kind of fun frustration and desire to try again to beat a particular part of your level design.
If this is not possible then try to make the final playing of each other’s games a real event. The use of the hardware and especially decoration of cardboard cabinets can really help to create a sense of an event. Also ask participants what they want to do to celebrate, share food, play music as a shared play list for example.
You may want to have in place a form which allows participants to gather player reactions. This can be via a written form or a quick recorded interview if suitable.
Exploring - What kind of Game Player / Maker are You?
As digital and online games became more complicated Richard Bartle proposed that different people play these games in different ways and look to get different things out of them. In short there are different kinds of players. The Bartle test finds out what kind of game player you are. Do the online Bartle Player test. You may be able to find a way of doing it as a group by moving around the room.
This is also true of the way that people play games. There’s a well known model of different play style types by Richard Bartle. This model, which was based on observing and analysing the behaviours people playing together in a multi-user game, holds that there are four different kinds of play style interests, each of which is given a descriptive name: Griefers, Achievers, Explorers, and Socializers.
- Griefers: interfere with the functioning of the game world or the play experience of other players
- Achievers: accumulate status tokens by beating the rules-based challenges of the game world
- Explorers: discover the systems governing the operation of the game world
- Socializers: form relationships with other players by telling stories within the game world
Different kinds of games suit different play styles. One of the notable successes of recent years have been open world games that allow you to choose how you play the game. If you want to stick to the main missions you can follow guidance to do that but if you just want to explore or be social or mess around you have the chance to to do that too.
In the same way there are different styles of making games. I’m proposing the following;
- Social makers: form relationships with other game makers and players by finding out more about their work and telling stories in their game
- Planners: like to study to get a full knowledge of the tools and what is possible before they build up their game step-by-step
- Magpie makers: like trying out lots of different things and happy to borrow code, images and sound from anywhere for quick results
- Glitchers: mess around with the code trying to see if they can break it interesting ways and cause a bit of havoc
As well as different game player types, there are also different game maker types. These are listed here, but if you are a planner then you may want to really know how all of the code for our game works before you start to make other changes to it.
Step by Step Tutorials - (suits Planners especially)
If you are a planner then you may want to take the time to work your way through these tutorials. If not jump right on to the next section.
Adding Game Patterns to a Starting Template (suits Magpies especially)
In part one we made changes by adding features called Game Patterns to a broken game. We are now going to start from with a similar Platform Game Template to Remix. It is a bit simpler, for example there is only one level and you don’t have to collect all food before winning. There are many ways of thinking about these patterns but in this guide we are dividing them up into the following:
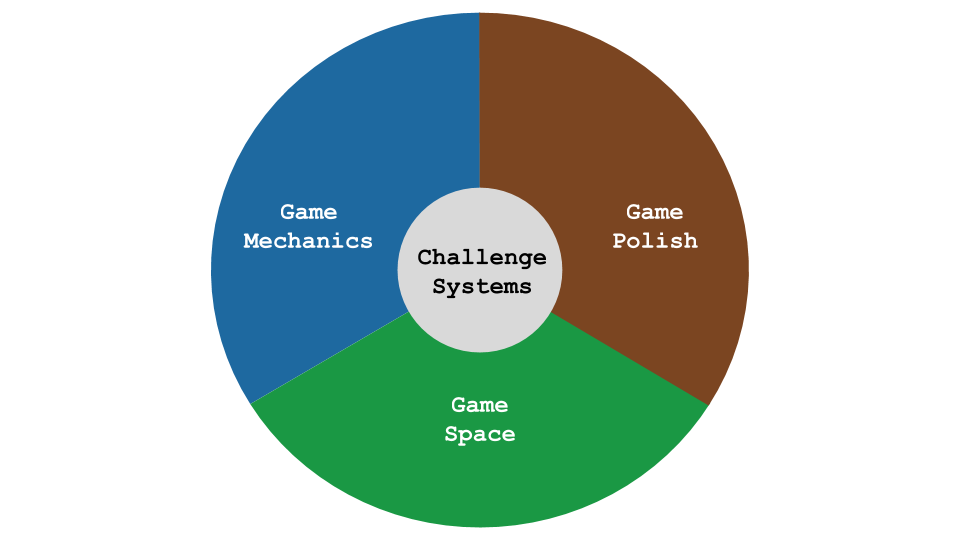
- Game Mechanics: things to do with the actions of the game
- Game Space: things to do with the layout of the game
- Game Polish: music, backgrounds, graphics and story elements
- Challenge and Systems: how different elements interact to create challenge
Find a fuller list of the different Game Patterns and how to apply them on this Page.
Extra Missions (suits Socializers and Griefers especially)
Extra Mission Cards These extra missions encourage us to think of our games as dynamic systems that change as we play the game.
Mission Cards for this Sessions
You can point them towards elements of systems thinking that arise from these challenges. These may include the following.
Predicting Code Outcomes via a Matching Game
Matching Games to Code Game
On entry participants play the following games (from MakeCode )
- Galaga
- Duck Run
- Eat Fruit
- Level Up
The next activity is to try to match cut out screen grabs to each of the games. [See print outs here] (https://drive.google.com/drive/u/0/folders/1NEh-YHlNO_yr7lBx1tVySml-ZkvDtpbp).
Additionally as a bonus can you see any of the following:
- Variables
- Loops
- Logic
- Events
Guidance on Running Creative Design Sessions
Creative Design Game Making Session Summary
Follow the Creative Design Game Making Session pattern as outlined in week two.
- Set goals to add chosen game patterns
- Follow the coding help to make the changes you need
- Test the game yourself imagining the end player’s experi#### ence
- Play test other people’s game and get feedback for yours
- Reflect on our progress
Creative Design Checklist
Follow the Creative Design Game Making Session pattern as outlined in week two - Set goals, follow the coding help, self-test the game yourself, play-testing, reflection on our progress
In terms of goal setting. What is becoming special about your game. What are the final changes you want to make? Use the following check list to make quick changes to your game.
- Do you have a strong story for your game? Can you add one?
- Have you applied a Mission Card or a system pattern yet?
- Have you got a balanced of game patterns added?
Also pay special attention to the play testing phase this time to see if you can see any glitches that others may find in your game.
More Detail on Creative Design Game Making Sessions
Locate Academically. The sessions are informal and different participants will be doing different things at different times. However there is a general pattern to help organise the chaos of our game making sessions. The sessions are based around the following pattern.
Set Goals Have a look at the list of the different Game Patterns. Each Game Pattern has it’s own page. with descriptions of the patterns and details of how to add it to your platform game. For now choose 2 patterns to add to your game. Choose at least one that you think will be quick to implement. We will add them to our game before the end of the session. Fill out the Goal Setting sheet. ( Create this sheet )
Create See the sheet and the pages to help you make the changes. These are normally step by step instructions. Sometimes there are places where you make your own decisions. Think about story of the game and the characters involved.
As we make changes to our game we will learn about the specific coding concepts needed to do computer programming, ideas like loops and logic. We’ll also find links to wider patterns of computer programming and systems ideas that are important in the world of Human Computer Interaction and Systems Thinking. Have a look at a list of the learning dimensions we might pick up through our game making.
Test You should play your game after every change you make to see how it has changed the playing experience. Keep in mind the experience of the end player when you are testing your game. Also try to think about the right level of challenge for your game.
Share with Playtesting Playtesting is a great way to really understand how the changes to your game make an impact on how the player experiences it. If you are doing Playtesting as a group then be sure to test a couple of games and make sure at least a couple of people test your game. Use this linked feedback sheet to help give feedback on games. « ADD SHEET
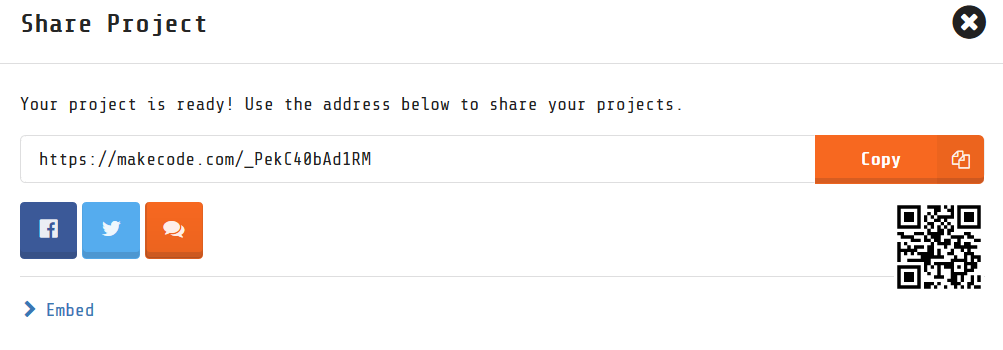
Publish Be sure to publish your work using the share link in the top right of the MakeCode edit screen. Give your game a name and ideally a version name. A good name communicates what’s fun about your game or its story to your audience. You can also use the MakeCode forum as a way of getting feedback this. To do this click on the image of the speech bubbles.
Reflect Reflecting on our progress allows us to getting the most out of the making to deepen our learning and make links to other areas of making.
There are different ways to do this, and if you are in a group you may want to make this into some kind of fun activity. There are some nice closure ideas here
Revising your Design Goals in the Final Stages
When you are making a game it is common to not have the time to make all the changes you want to make.
If you are nearing the end of the time you have allocated. You now have to make the difficult decisions to decide on the last big changes you will make to your game.
You also need to decide on which goals you will not be able to add to this game. To do this you can make a list and choose only the top two or three to work on. Try to use your experience from previous sessions to estimate how long this will take you. Try not to much more to your game in terms of new patterns. Focus as much as you can on the playability of your game. Make sure to allow time for a lot of self testing.
Supporting Debugging
Describe and Post a problem to your peers or the MakeCode forum
If you get stuck trying to add one element to your game then share a link of the broken game with your facilitator or the friendly online MakeCode community.
Also if you get stuck on one problem don’t let that stop you. Go back to your last working version and try to add a different game pattern. That way when you solve your original problem you can add in the changes to your new version.
Understanding types of errors and dealing with them
Can this be made into a game of some kind ? There are different kinds of that you may come up against. Knowing how to deal with them is a good tactic to keep us progressing.
- Syntax and Program Errors are errors in your code which stop the game from functioning at all.
- No Behaviour Bugs are errors which in your code which don’t stop the game from functioning but your intended effect is not present when it should be.
- Glitches don’t stop your game from running but as you play you see that there is an unintended effect the game does something different from what we want it to do.
Recognising and Fixing Program Errors and Syntax Errors
Syntax Errors are mistakes in the code we write, there are a lot of things MakeCode does to make it harder for us to make these kinds of syntax errors. However they can arise when we put the wrong kind of block in a particular location.
You may get a Program Error on the screen and a Black screen in the preview window.
The problem may be to do with the order of your code. The code in the screenshot here tries to move a sprite to a location but before it has even been created. If you get one of these code try reading through your code to see if it is the right order.
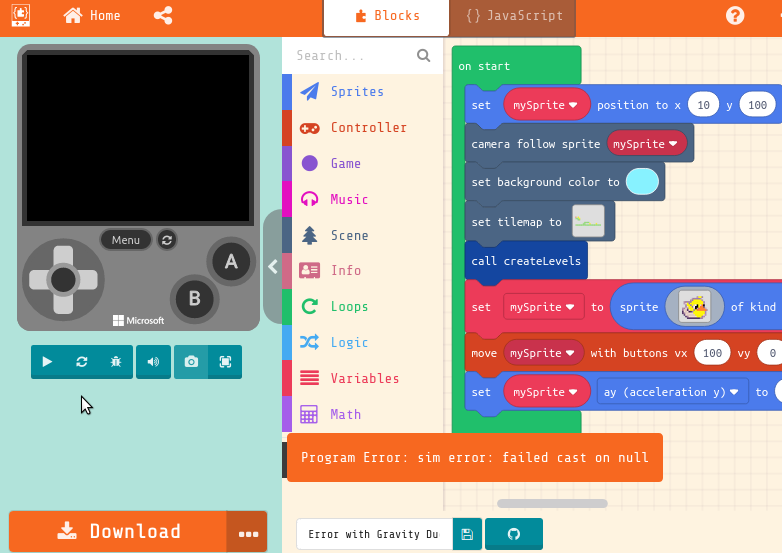
A similar type of error is a Syntax Error. When there is a syntax error in MakeCode Arcade your game will not run and may just show a grey version of your game in the preview window.
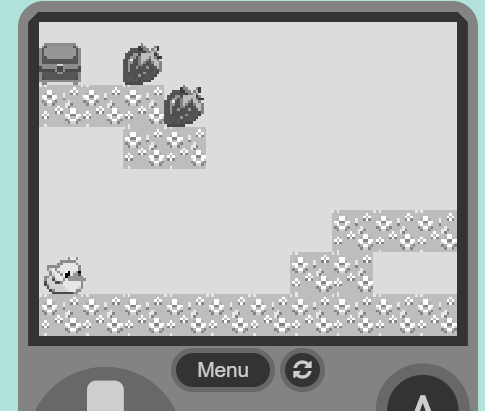
When this happens have a look for the ! sign in a hazard triangle somewhere in your code. This is where the problem is.
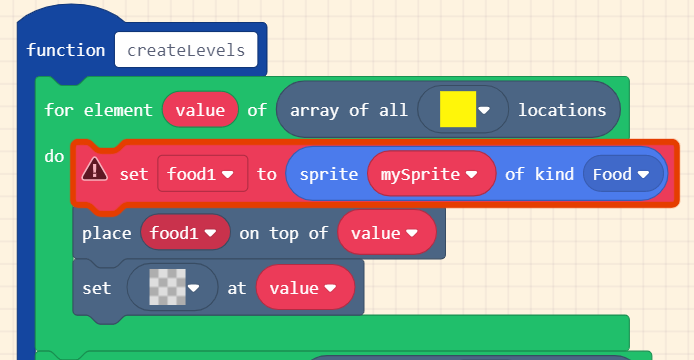
Click on the triangle and you will get more details of what the error is about.
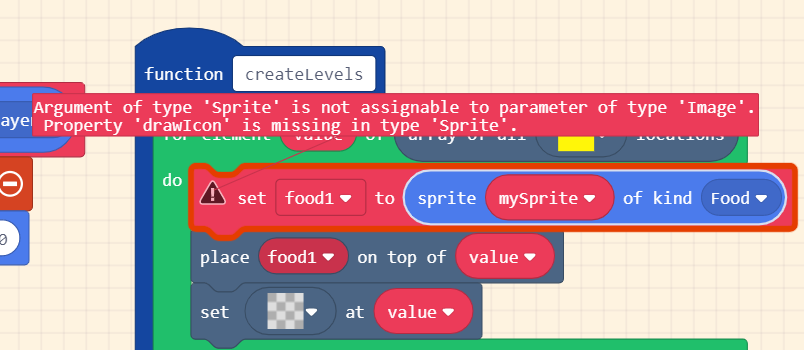
This may not make a lot of sense to you. But often it is due to putting the wrong kind of block in the gap. In this case there should be an Image block in this gap. The code error message can help us debug our code as even if we don’t fully understand it, at least we know where the problem is. We can try out different blocks in this space to solve the problems. Also you can use the undo button at the bottom of the screen to go back in stages to a situation where the code was working. If you have made a few changes keep pressing that buttons until the game preview is in colour again.
Finding and Fixing Glitches and No Behaviour Bugs
This is not universally accepted as a difference but for the purposes of this course bugs and glitches are different.
- Bugs are mistakes in the code where the intended effect doesn’t happen so you can’t achieve what you want
- Glitches are mistakes where unintended effects do happen that are different from what you wanted
Bugs and Glitches often show up when we are testing our game. Sometimes they show themselves quickly when we are self-testing, sometimes it takes other people playing the game to find glitches that’s why play testing is so important.
While bugs are often just frustrating, we can sometimes celebrate glitches. They can be fun and are normally a good way for us to understand more about what is happening on a code level.
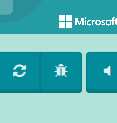
One technique you can use to try to solve glitches or bugs is through debugging with a technique called watching variables. To do this click on the image of the bug under the game preview window.
This brings up a new window and also changes how the blocks look on the block building part of our screen. It puts little squares next to them. These allow us to set code break points. A break point is a way of stopping the running of the game code at a certain point. In our case let’s use an example were we do that to check the value of a variable we have created.
Imagine we want to increase the gravity every two seconds as the game progresses. Just a little, so the game gets harder as time goes on. The desired behaviour is to change the gravity so it increases by 10 each 2 seconds. To do this the following blocks are tried.
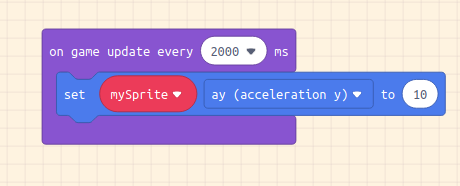
The desired behaviour doesn’t happen. The player gets lighter not heavier. You may see the mistake right away but imagine you don’t.
Turn on debugging by clicking on the image of the bug under your preview screen.
We are going to set break points in our code to see what is happening. Do this by clicking in the circle next to the code we are interested in. In this case in our game update loop.
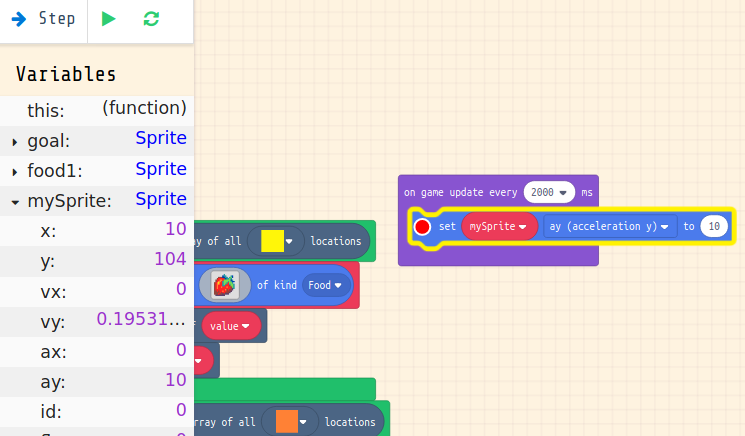
Now click on the green Play button to start running the code. It will stop when it gets to the break point. We can now see what the value of the variable we are interested in is at this point. In this case click on the arrow next to mySprite to see what the ay (gravity) variable is. We can see that instead of increasing by 10 each 2 seconds it is being set directly to 10 instead.
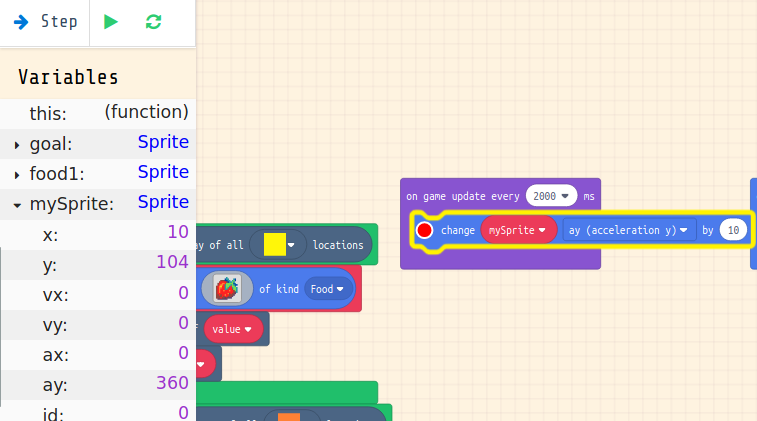
Now we know this is the cause of the error we can change the block to change mySprite ay by 10 instead. If we repeat
the debugging then we’ll see the value go up in steps of 10 each time we click on the green play arrow to step through
the code.
When you are self-testing or play testing games and find mistakes find out the following:
- What type of error are you encoutering - Errors, Bugs or Glitches?
- If they are black or grey screen errors can you find any messages?
- If they are bugs glitches what is the different between the intended behaviour or effect and the actual behaviour?
- What tactics are there to solve the errors, bugs or glitches?